【任意Linux服务器之上部署SSH-Key】
参考:http://www.isetsuna.com/vps/set-ssh-key-bandwagonhost/
参考:https://www.vultr.com/docs/how-do-i-generate-ssh-keys/
如果想知道是否有人在爆破你的SSH密码,可以查看 /var/log/auth.log 文件,如果看到一堆异常IP在刷屏,那必须重视了。
为了防止密码被爆破,可以使用SSH Key的方式来登录,并关闭密码登录方式,还要修改SSH端口以避免被大范围扫描。
【生成SSH Key】
用PuTTY登录到VPS,执行以下命令生成SSH Key:
ssh-keygen -t rsa
输出:
Generating public/private rsa key pair.
Enter file in which to save the key (/root/.ssh/id_rsa):  #保存路径,直接回车
Created directory '/root/.ssh'.
Enter passphrase (empty for no passphrase):  #输入密钥密码,直接回车
Enter same passphrase again:  #重复密钥密码,直接回车
Your identification has been saved in /root/.ssh/id_rsa.  #私钥保存路径
Your public key has been saved in /root/.ssh/id_rsa.pub.  #公钥保存路径
The key fingerprint is:
c3:b6:9f:95:8f:b9:13:60:4a:75:07:f3:5d:72:99:e5 root@Setsuna
The key's randomart image is:
+--[ RSA 2048]----+
|            o.. B|
|          . .o.B.|
|         . . .. E|
|       .. o      |
|       .So .     |
|       ..o  ..   |
|        .   o.   |
|         . o.+   |
|          o +o.  |
+-----------------+
如果不在本机使用,需要在所使用机器上创建 .ssh 目录:
cd /root/ && mkdir .ssh && chmod 700 .ssh
上传文件:id_rsa.pub 和 id_rsa 。
修改公钥文件名和权限:
mv /root/.ssh/id_rsa.pub /root/.ssh/authorized_keys && chmod 600 /root/.ssh/authorized_keys
【生成ppk文件】
用WinSCP登录到VPS,打开 /root/.ssh 文件夹,将私钥文件 id_rsa 文件下载到本地。
运行PuTTYgen,选择 Conversions–>Import key ,选择私钥文件 id_rsa ,会出现如下界面:
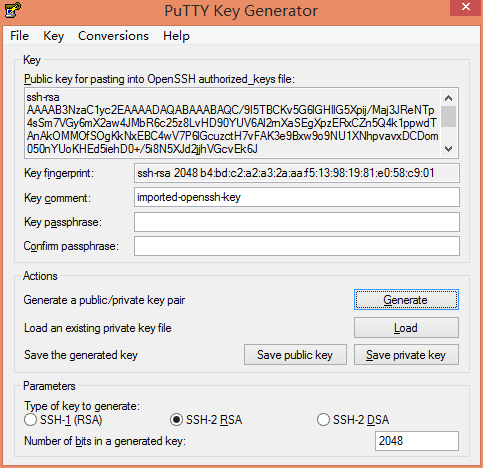
点击Save Private Key,将私钥保存为.ppk文件,文件名可自取。
注意:请一定要妥善保管好私钥文件id_rsa和.ppk文件!
【登录设置】
在WinSCP登录窗口设置你的VPS域名和SSH端口,用户名root,密码留空。
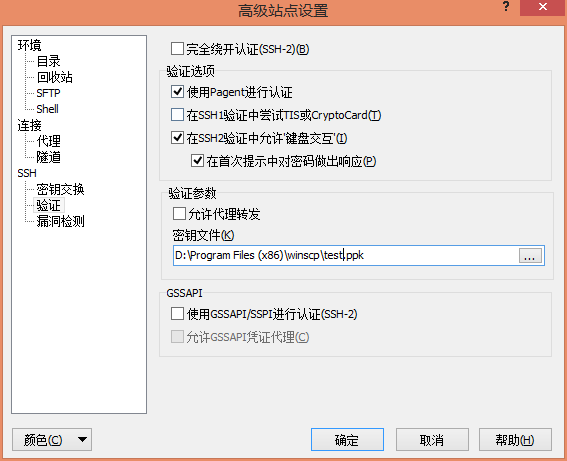
点击高级->SSH->验证->密钥文件,选择之前生成的.ppk文件,然后确定保存。
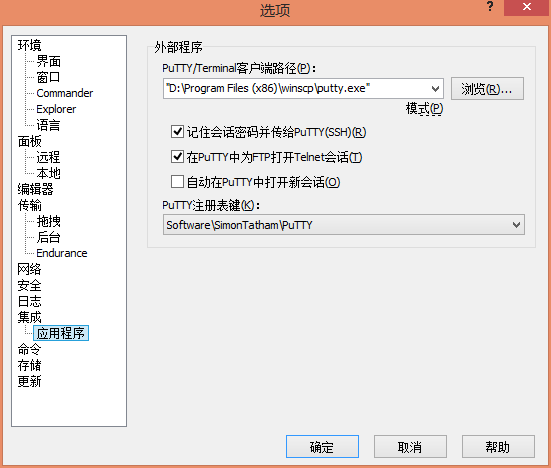
点击工具–>选项–>应用程序–>PuTTY客户端路径,选择PuTTY程序的路径,并勾选记住会话密码并传给PuTTY选项,然后确定。
点击登录,如果一切正常的话,会提示与公钥进行认证,然后成功登录。
如果要用PuTTY的话,可以在WinSCP窗口上方点击在PuTTY中打开会话,即可启动PuTTY并自动登录。
如果不需要登录WinSCP只登录PuTTY,也可以在WinSCP登录窗口,点击管理–>在PuTTY中打开,来进行自动登录。
(建议把PuTTY程序和私钥以及ppk文件放到WinSCP文件夹下,这样只需要拷进U盘即可随身使用)
【修改SSH配置】
用WinSCP打开 /etc/ssh/sshd_config 文件,修改以下两项:
Port 22  #SSH端口,建议修改为一些非常用的高位端口
PasswordAuthentication yes  #yes修改为no,如果前面有#号请去掉,关闭密码登录方式
然后重启SSH服务即可生效:
service sshd restart
Debian/Ubuntu执行:
/etc/init.d/ssh restart
CentOS执行:
/etc/init.d/sshd restart
最后,记得在WinSCP的登录窗口中更新新的SSH端口。
【DigitalOcean之上部署SSH-Key】
参考:https://cloud.digitalocean.com/account/security
【生成】
官网:https://putty.org/
下载:https://the.earth.li/~sgtatham/putty/latest/w64/putty-64bit-0.70-installer.msi
安装后,使用 puttygen.exe 生成公钥/私钥对。
生成公钥/私钥对并保存:
ssh-rsa AAAAB…ErK5NQ== rsa-key-20181010
Key fingerprint
ssh-rsa 2048 a1:16:21:23:76:d7:67:dd:a7:7e:bd:15:51:69:24:5a
Key comment
rsa-key-20181010
Key passphase
H8I1uc6zrtYtGa47FkWJaWivh
【使用】
1. 在DigitalOcean.com面板中添加SSH Key中的公钥,命名,保存;
2. 在DigitalOcean.com面板中创建新Droplet,关联以上SSH Key;
3. 在WinSCP中,高级选项》选择私钥private.ppk;
4. 成功连接后,填入 Key passphase,即可正常登录。
【怎样为已有 droplet 添加 ssh-key 】
参考:https://www.digitalocean.com/docs/droplets/how-to/add-ssh-keys/to-existing-droplet/
参考:https://www.digitalocean.com/community/tutorials/how-to-set-up-ssh-keys–2
参考:https://www.digitalocean.com/docs/droplets/how-to/add-ssh-keys/
参考:https://www.digitalocean.com/community/questions/add-ssh-key-after-creating-a-droplet
参考:https://stackoverflow.com/questions/38528797/digitalocean-add-ssh-key-to-droplet-not-working
DO并无提供API以向已有 droplet 添加 ssh-key,此API仅当创建时可以指定ssh-key。
如果您想向已有 droplet 添加 ssh-key ,可以手动添加到 ~/ssh/authorized_keys
DigitalOcean does not provide an API endpoint to add an ssh-key to an existing droplet. The API will allow you to specify a key when you create a new droplet.
Once your droplet has been created you will have to add additional keys manually by adding them to ~/ssh/authorized_keys
To add a SSH key after the creation of the droplet, you need to add the contents of the public key to the file ~/.ssh/authorized_keys You can do that by running this on your local computer:
cat ~/.ssh/id_rsa.pub | ssh [email protected] "cat >> ~/.ssh/authorized_keys"
然后输入shell密码,即完成添加。
是否可以 [email protected] ?
参考:https://blog.csdn.net/w294954902/article/details/80052425
参考:https://blog.csdn.net/ccfxue/article/details/52608829
登录时报错:
server refused our key
服务器拒绝了我们的私钥
参考:https://blog.csdn.net/coolhty/article/details/7351255
id_rsa.pub 中的格式是多行的,务必使用生成SSH-Key时产生的1行代码覆盖。然后就正常了。
【参考】
参考:https://laozhu.me/post/make-server-secure/
参考:http://blog.sina.com.cn/s/blog_a2be73ab0101fukv.html
参考:http://www.isetsuna.com/vps/set-ssh-key-bandwagonhost/
参考:http://cncc.bingj.com/cache.aspx?q=digitalocean+ssh+%e7%ab%af%e5%8f%a3centos&d=4594448595294139&mkt=zh-CN&setlang=zh-CN&w=iK1T0BovL4wpUD_uXKhmk51YkhJ6YVQ5
参考:http://www.cnblogs.com/smarterplanet/p/4330902.html
参考:https://blog.csdn.net/happyhuirong/article/details/41729911
参考:https://winscp.net/eng/docs/guide_digitalocean
参考:https://www.digitalocean.com/docs/droplets/how-to/add-ssh-keys/to-account/
参考:https://winscp.net/eng/docs/guide_digitalocean#setting_up_public_key_authentication
参考:https://www.digitalocean.com/docs/droplets/how-to/add-ssh-keys/to-existing-droplet/