原文:http://www.udemy.com/email-marketing-how-to-build-an-email-list-of-customers/
有空了,再把这篇文章翻译整理下。历史证明,经营客户邮件列表是一件多么重要的事情。它能将1美元变成100美元。
Email Marketing: How To Build an Email List of Customers
Email Marketing is one of the most effective ways of building an audience, creating an online business and making money.
However, you may prefer to think of an email list as a marketing tool that creates a relationship with your potential customers.
An email list is a business asset
“If you aren’t building an email list, you’re missing out on the most powerful and consistent way to drive repeat visitors and customers to your website or blog.” – Corbett Barr from ThinkTraffic.net.
I’ll explain the importance of thinking of your email list as a collection of people rather than a collection of email addresses or – even worse – a way to make money.
- I’ll recommend you don’t constantly send sales emails.
- I’ll tell you about the importance of an offer and how often and how much you should give away for free
- I’ll explain about incentives and lead magnets.
- I’ll introduce the squeeze page and show you how to make one
- I’ll show you the best ways to create signup forms and where to put them on your website
- I’ll explain about the “Thank You” page and the “Welcome” page.
The process of collecting email addresses and bulk-emailing out to them in a way that by-passes the spam filters and stays on the right side of the CAN-SPAM act is phenomenally complicated.
That’s why I’ll show you step by step instructions of exactly how to use the powerful tools of two of the foremost email marketing services: Aweber and Mailchimp.
I’ll also show you about email messages – the different types you can send, how to send them, when to send them and the best ways of writing effective emails to drive traffic and sales.
Many online businesses focus, incorrectly sometimes, on social media, whereas Email Marketing provides a much better return on your investment.
“If they’re liking the content you’re sending them regularly, then there’s a good chance they’re going to like the products you create. Email subscribers are more likely to buy your products than any other type of audience.” – Glen Allsopp from ViperChill.com.
If you focus on providing value and engaging subscribers, Email Marketing will bring success for your business.
-
- Computer
- Internet
-
- Over 13 lectures and 1.5 hours of content!
- Add a signup form to your website
- Create a squeeze page on your website
- Set up an auto-responder/followup email sequence
- Send broadcast emails
- Set up newsletters
- Write effective sales emails
-
- Anyone
CURRICULUM
-
SECTION 1:
Introduction
-
1Introduction to Email Marketing16:30
Email Marketing is one of the most effective ways of building an audience, an online business and making money. Let’s get going.
My name is Rob Cubbon. Please join my email list here so you will understand the process and the following terms:
- squeeze page
- email list
- lead magnet
- thank you page
- success page
- auto-responder sequence
- etc.
Think of an email list as a marketing tool that creates a relationship with your potential customers.
An email list is a business asset.
It is important to think of your list as a collection of people rather than a collection of email addresses or – even worse – a way to make money. I don’t recommend you constantly “spam” your list with multiple sales emails.
Don’t get me wrong, an email list will make you money, but focus on the relationships first.
An email list is the most powerful and consistent way to drive traffic. Much better than social media.
“Email lists, quite simply, can make a lot more money than regular blogs, which is why so many marketers focus on them. Having permission to repeatedly email someone – something you shouldn’t take for granted – will often result in them buying the products you promote. If they’re re liking the content you’re sending them regularly, then there’s a good chance they’re going to like the products you create. Email subscribers are more likely to buy your products than any other type of audience.”
– Glenn Allsopp from ViperChillThe importance of an offer.
One of the most important skills in email marketing is driving traffic to your sign up form or sign up pages and getting a high-converting offer to collect email addresses.
This “incentive” or “lead magnet” is some sort of freebie that offers tangible value to your target market.
This incentive can be an free ebook (most commonly), a free report, a free video tutorial, a free series of videos (that aren’t already on YouTube), a free audio, free software, etc.
The incentive needs to be of value and solves a major problem of your target market.
People in your target market will be happy to part with their email address in exchange for something that’ll help them with a pain point.
The Squeeze page
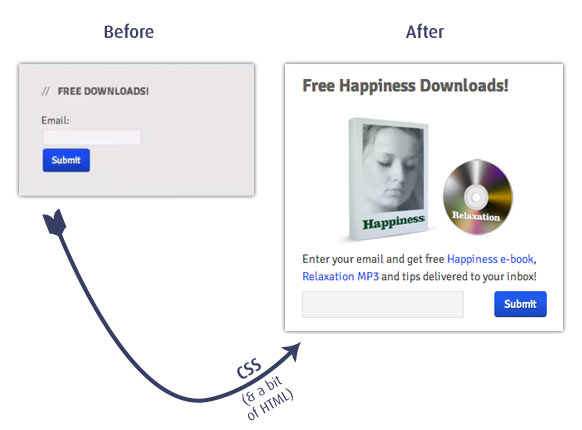
And this offer will reside on a page that will collect the email addresses. This page is commonly called a squeeze page. A squeeze page can be tested and tested to see which design and text converts the most people – from visitors to subscribers. A squeeze page should include a benefit driven headline, text that explains the usefulness of the offer, an image of the offer and maybe video as well.
Thank you page
The thank you page is an important piece of internet real estate – so take time to create a great first impression.
Then the subscriber clicks on the resulting email and – bam!!! – this is the point at which the subscriber is on the list and should receive their incentive. This can be done either by delivering it in another email (the welcome email which is the first in the auto-responder series) or one the page they land on when they click the confirmation link.
The Success Page
Finally, this page is the page where they visit once they’ve successfully confirmed their email address and have joined the list.
This is the page where you can deliver the promised incentive (e-book, etc.). And, this can also be turned into a golden page as you can present your new subscriber with an offer of one of your paid for products.
Email marketing services
The process of collecting email addresses and bulk-emailing out to them in a way that by-passes the spam filters and stays on the right sited of the law is phenomenally complicated. For this reason I definitely recommend that you use some sort of email marketing service.
The email marketing services I’ll be recommending are AWeber and MailChimp. They are both excellent companies. I have used both of them for years and years. I prefer AWeber because they deliver more emails, their support is really good and they are cheaper than MailChimp when you have more than 2,000 subscribers.
Blog broadcast emails
Blog broadcast emails are completely automated emails that are send out with your latest blog posts in them. They don’t take long to set up and take zero time to maintain. However, they may lack the personal touch.
Broadcast emails
Broadcast emails are normal emails you can send out to your subscribers or segments of your subscribers. You can split test them by sending out the same email with two different titles to two lots of 10% of your list and then send the remaining 80% the email with the most successful title. You can add recency and urgency with broadcast emails by referring to “one time offers” or current events.
Auto-responder / Followup emails
An auto-responder or followup message is an email that’s delivered within a timed sequence. It’s similar to those “out of the office” responses you get. It’s a pre-written message, therefore, that gets delivered automatically.
Conclusion
One things is for sure. Make sure you keep emailing everyone on your list at least once a week or, at most, a fortnight. Less than that and people will forget you. If they suddenly receive a message out of the blue they could think that it was spam!
If you focus on providing value and engaging subscribers, Email Marketing will bring success for your business.
The links to Aweber and MailChimp are affiliate links. Please contact me if you have any questions
-
SECTION 2:
Aweber tutorials
-
2Introduction to AWeber03:38Introduction to AWeber – email marketing software.
-
3Creating a new list and sign up form in AWeber10:25
Creating an email list is one of the most important internet marketing tasks any small business can employ. Subscribers to an email list are more likely to respond to offers and make purchases than visitors to a site. Moreover, nothing cements allegiance to a brand better than a regular newsletter delivered to someone’s personal inbox.
Of course, you don’t have to use Aweber. MailChimp and iContact are also great email service providers. The challenge is always to get their forms on your website in a seamless and branded way.
I’m doing videos in ScreenFlow these days instead of iShowU – thanks, Tara! – and as a result they are all in HD. So if anything is unclear in the videos, simply click on the Change Quality cog in the bottom right of the video and watch it in super-sharp high def!
How to create an email list and a sidebar sign-up form
In the first video I show how to create a list with a free incentive (in this case a free e-book and MP3) by:
- creating an email address in cPanel
- creating the four pages you need to create a list in Aweber
- creating a list in Aweber
- setting up a form in Aweber
- putting that form on your website and styling it with CSS so it looks how you want it to
Quite a lot! But the good news is it doesn’t take 10 minutes.
The four pages I create on a site first in order to These four pages are by no means essential to create but it does give your subscriber a more seamless and branded experience.
- A squeeze page
- A thank you page
- A success page
- An “already subscribed” page “whoa there, tiger!”
If you don’t create these pages your subscribers will see Aweber branded generic pages instead – apart from the squeeze page, of course.
A squeeze page is a page where you really sell your free offer and try to get the most sign-ups you can. For example, here is the squeeze page for the subscription list on this site. Once the visitor enters an email address and hits “Submit” they are taken to the thank you page where they are told they still have to confirm their email address by clicking on a link in an email they’ve been sent. The already subscribed page is for those who have submitted an email address that is already on the list.
You then set up a new list in Aweber and create a new form for that list (see in the above video).
In order to create a sidebar sign-up form I get the most basic HTML I can from Aweber and paste it into a text widget in the sidebar. Of course, I’m using the Genesis theme on WordPress which has widgetized sidebars, but if you don’t have widgets you’d paste it into the sidebar.php of your theme.
-
4Styling a Sign Up Form11:04
Styling up the sidebar form with CSS
Now comes the fun part – getting the form to look how you want it to!
In this video I show how you style up one sidebar widget without effecting the style of the rest of the sidebar. If HTML is marked up properly (as it always is with Genesis), you can use CSS (Cascading Style Sheets) to style up every individual element on a website or style up similar elements on a website (such as all the input buttons). Hence the “Cascading”.
So, this sidebar sign-up form pasted in as a text widget initially looks the same as all the other similar elements on the sidebar. They have the same background, the same padding and margin, the same type of heading, etc. I use Developer Tools in Chrome to identify the particular widget and see how to change the look of it. More about styling sidebar widgets here.
In Genesis, all widgets (and all elements) have unique identifiers in the HTML. In the example in the video, the text widget’s identifier
<div id = "text-4">this means if you add#text-4to style up elements in the CSS, it’ll effect this particular widget and not all the others. CSS can be a nightmare to understand but if you keep at it and make mistakes, you’ll learn it!Also, you can change the text of the form and add an image by changing the HTML within the text widget.
-
5Creating a “Squeeze Page”08:50
Adding other forms to the squeeze page
HTML from Aweber (or whatever email service provider you’re using) can be placed in the body of any WordPress page.
If you want to create other forms, you could just paste the same HTML from the sidebar text widget into a page. But I would go back to Aweber and go through the process of creating a new form first and grabbing new HTML. This way you’ll be able to track which forms work best on your website by seeing how many sign ups you get on each.
In the video for this lecture I show you how to do this. After I paste the HTML into the WordPress page, the first thing I do is to wrap it in a containing div.
<div class="signup-form">
paste in the sign up form HTML from Aweber here
</div>This is, again, so that I can isolate this particular form in the CSS. It does the same thing as
<div id = "text-4">does in the earlier text widget example. Thediv class="signup-form"in the HTML is identified as.signup-formin the CSS; thediv id="text-4"in the HTML is identified as#text-4. So dots forclasses; hashes forids. What’s the difference between aclassand anid? Theidshould be used once on a page;classes can be used many times. -
6Sending FollowUp / Auto-responder emails with AWeber06:02Sending FollowUp Messages in AWeberAn auto-responder or followup message is an email that’s delivered within a timed sequence. It’s similar to those “out of the office” responses you get.It’s a pre-written message, therefore, that gets delivered automatically.
-
7Sending a Broadcast Email with AWeber04:27
Sending a Broadcast Email with AWeber
How to send out or schedule an email to your list, a segment of your list or a split test.
-
8Sending Blog Broadcast Emails with AWeber06:45
Here is the text for the custom blog broadcast email:
Type what you want to say in every message here.
{!rss_itemblock}
{!rss_item_title} <= Remember to link this to: {!rss_item_link}
{!rss_item_content} <= Full content
{!rss_item_description} <= Partial Content{!rss_itemblockend}
This email is sent to you because you subscribed to blog updates on this website.
Here is your subscription information:
Email: {!email}
Subscribe Date: {!signdate long}You are free to unsubscribe from these newsletters if you wish. No hard feelings!
-
SECTION 3:
MailChimp tutorials
-
9Add a MailChimp Sidebar Form with a WordPress Plugin02:48
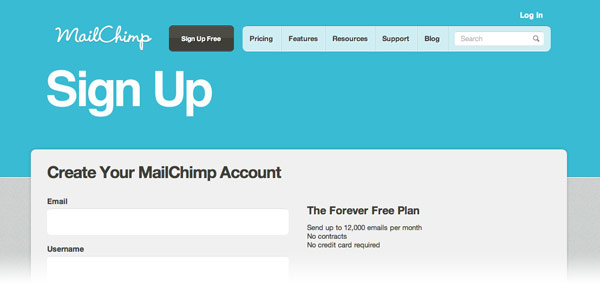
Create a email list and forms in 5 minutes with MailChimp
Sign-up to MailChimp by entering your email, username and password, and click the activation link in the email you subsequently receive. You then have to fill out some more details that include your address in order to comply with the CAN-SPAM Act, and international spam law. This means that your address will be on every email that you send out.
There is then an option to connect with your Twitter and Facebook accounts which will help you share your campaigns with social networks. Otherwise, go straight to emailing!
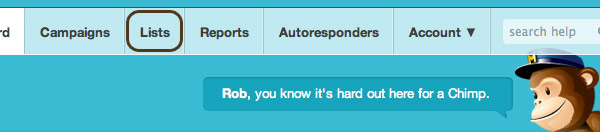
Click on Lists (circled above) in the MailChimp top navigation bar and then Create List. Now you should enter values for:
- list name (this is for your benefit)
- default from name (make this your actual name so it looks to your subscribers as though is coming from you personally – very important)
- default reply-to email (again, make this your actual personal email, rather than an info@, to make the experience more personal)
- remind people how they got on your list (again, this is very important, if you get too many people unsubscribing you won’t be allowed to continue so write “you are receiving this email because you signed-up to the mailing list at my website”. If you offered an eBook as an incentive to join the list, mention that as well.)
Don’t worry about any of the other fields and click Save. Congratulations! You have set up your first list. You even have one subscriber already (that’s you, the email you entered in the previous page!)
So what exactly is a widget?
Widgets in WordPress are various modules that you can edit, arrange, add to or remove from your sidebar without having to change any code. A standard WordPress installation comes with a few basic widgets such as previous posts, category listing, tag cloud, site search form, etc. However, the MailChimp sign-up form widget needs to be downloaded first. More about WordPress widgetshere.
Putting the MailChimp form widget on your WordPress sidebar
Now, you can go to your WordPress administration area and click “Plugins”. And then click “Add New” to find the MailChimp Widget plugin for WordPress.
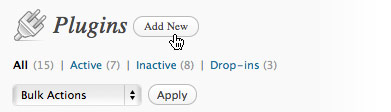
Search for the MailChimp plugin:

Install and Activate plugin:

You will get a red notice at the top of the WordPress administration area saying: “You’ll need to set up the MailChimp signup widget plugin options before using it. You can make your changes here.” This link will take you to Settings > MailChimp Widget in WordPress. Where you’ll be asked for your MailChimp API Key.
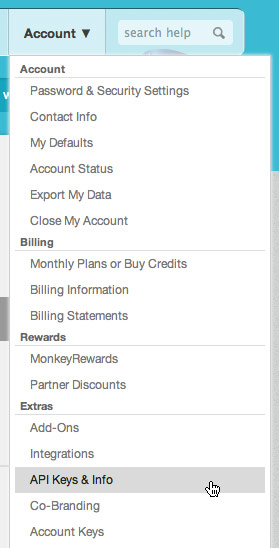
Go back in MailChimp, and in their top navigation bar, click the downward arrow next to Account, and choose “API Keys & Info” right at the bottom there:
And then at the resulting page, click “Add a Key” and you should look for a long series of numbers and letters, a little like this:
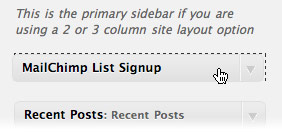
567967df8321a3d55d4a5c36148bded5a7-us2Copy that and paste it in your MailChimp Widget Settings in your site’s WordPress backend and click “Save Changes”. Next go into Appearance > Widgets and basically all you have to do is drag the MailChimp List Signup widget over from Available Widgets in the middle of the screen into Primary Sidebar on the right of the screen or into whatever widgetized area you prefer.
Of course, this is assuming your theme has a widgetized area.
Styling up your MailChimp Signup Form Widget to look beautiful
It is possible to control every element of your sign-up widget. By using the Chrome Developer Tools (View > Developer > Developer Tools) or the Firebugadd-on for Firefox, you can identify the
div idthat the widget is wrapped in.In my particular example, it comes wrapped in
div id="ns_widget_mailchimp-3", which makes it easy to style the elements of the form. Yours may come wrapped in a different selector, maybe “ns_widget_mailchimp-2″ or “ns_widget_mailchimp-4″ so please check!I put the following into my style sheet, which is usually a file called
style.cssin your theme folder that you can access by the backend WordPress > Appearance > Editor. This CSS gives the input boxes some nice shading and gives the button rounded corners, a background and text shadow.#ns_widget_mailchimp-3 form { margin : 10px 10px 0 ; }#ns_widget_mailchimp-3 input[type="text"] <br>{ width : 273px ; box-shadow: inset 1px 1px 1px rgba(0, 0, 0, 0.1); <br>-moz-box-shadow: inset 1px 1px 1px rgba(0, 0, 0, 0.1); <br>-webkit-box-shadow: inset 1px 1px 1px rgba(0, 0, 0, 0.1); margin-bottom : 5px ; }#ns_widget_mailchimp-3 input.button { <br>background: #9bcfe2 url(images/button-grad.gif) repeat-x; <br>text-align: center; font-weight: bold; -moz-border-radius: 8px; <br>-webkit-border-radius: 8px; -khtml-border-radius: 8px; <br>border-radius: 8px; border: 1px solid #9bcfe2; color: #444; <br>text-shadow: 0px 1px 1px white; height: 28px!important; <br>width: 105px!important; font-size: 14px; line-height: 20px; }And, over in the WordPress > Appearance > Widgets area you can choose whether you want first name and last name fields and what text to go in the form’s button, etc.
-
10Embed Forms on your website with MailChimp05:25
An essential internet marketing strategy is to make signing up to your list as easy as possible. To do this I like to have a sales page or squeeze page for the list which explains the various benefits of signing up.
If this squeeze page is quite long it’s nice to put an email capture form at the beginning and end of the form. One at the top for those visitors who just want to sign-up straightaway. And one at the bottom for the visitors who, after reading about the fantastic incentives for signing up to the list, wish to sign up without having to scroll up or down the page to do so.
I have set up many email lists with MailChimp. I like MailChimp because they offer all the email list services for free with up to 2,000 subscribers sending less than 12,000 emails a week.
I have already explained how to sign-up to MailChimp and add the sign-up form to your sidebar using WordPress Widgets.
The video shows an older version of MailChimp which you can get if you click
Once you have done that, click “Forms” in the list panel.
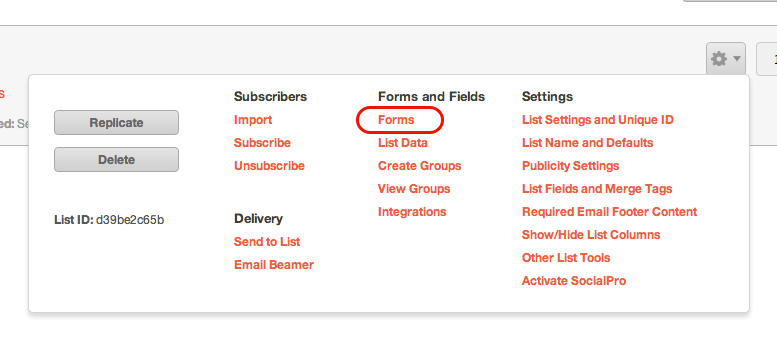
How to create a form in MailChimp
You can create a form on your website so that people can sign up to your list. To do this, first click Build It in the Forms section of MailChimp:
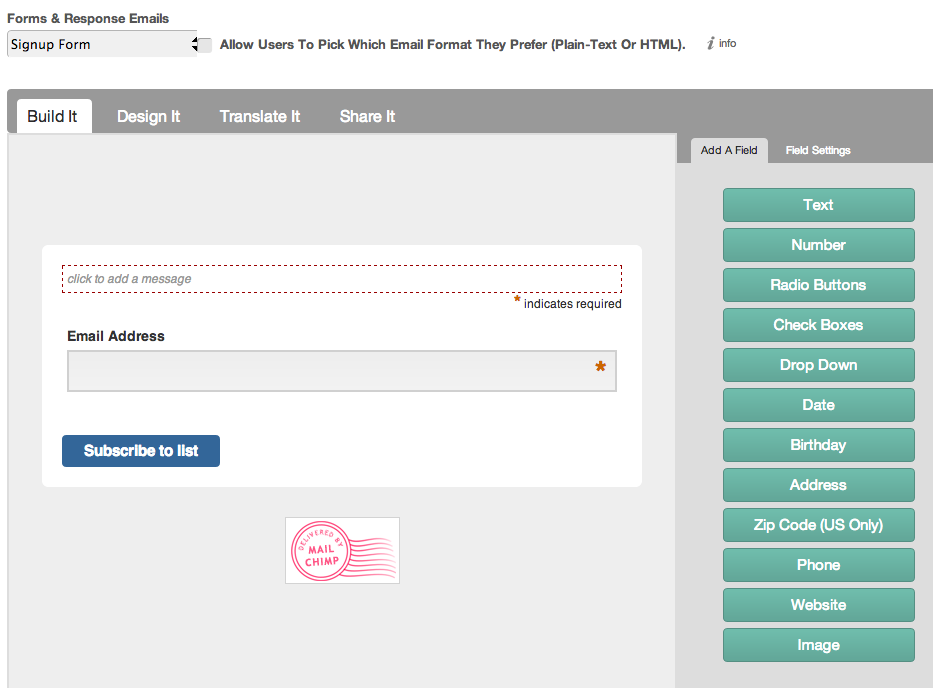
Build your form by choosing from the fields on the right.
In order to get the code to embed into your website’s pages go to the “For your Website” sub-page in the Forms section of MailChimp:
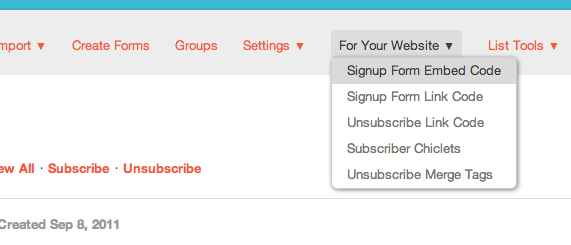
And then choose the Signup Form Embed Code option (above)
Adding More Than One MailChimp Sign-up Form on the Same Page
However, if you want to put more than one form on the same page you’re going to have to do things a bit differently.
Instead of pasting the code from the Signup Form Embed Code page into your site, paste it into a text document (using NotePad (PC) or TextEdit (Mac)) and call it “signup-form” or something like that. You may want to wrap the form in a
divfor styling and add some inline styles. So the HTML document will look something like this:<style type="text/css"><br><!--<br>lots of CSS to make your form look pretty<br>//--><br></style><div id="sign-up"><br>at least 50 lines of code copied from MailChimp goes here<br></div>Then upload this HTML document (“signup-form” or whatever you called it) to somewhere on your server.
Then in order to embed the code on the page (as many times as you want) you call the HTML in with an
iframelike this:<iframe src="http://your-site.com/mailchimp-form" frameborder="0" width="654" <br>height="200"><br><a href="http://link-to-form-on-mailchimp-site" target="_blank">Anchor text saying <br>"click here to sign up" or something like that for people whose browsers can't read iframes</a><br></iframe>As you can see above, inside the iframe tags is for browsers who don’t support iframes. To be honest, I’m not sure which browsers don’t support iframes – so this is just a precaution.
Remember: if you don’t use iframes and just paste the code in more that once, your potential subscribers will receive multiple emails which won’t make you popular.
-
11Sending out emails of blog posts with MailChimp05:16
RSS and WordPress
RSS stands for Real Simple Syndication and is a standardized format used to publish frequently updated works. Every blog has an RSS feed, if you go to your main blog page and type “/feed” after the URL the browser will output the RSS feed. In order to set up your RSS feed correctly in WordPress, go Settings > Reading, by “For each article in a feed, show” make sure you have the radio button on “Full text”. I think it’s best to give your subscribers the full blog post by email.
Create an RSS-driven campaign
MailChimp RSS to email tutorial link
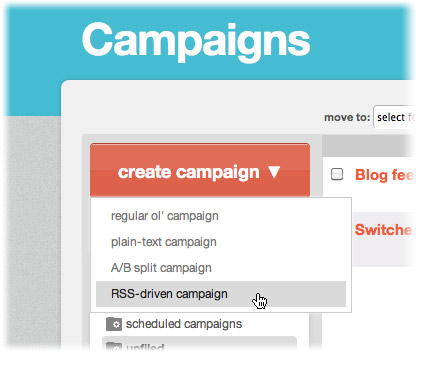
Once signed in to MailChimp, select RSS-driven campaign from the drop-down menu when hovering over the Create Campaign button. You are immediately asked for the RSS Feed URL.
If you don’t want to send all your blog posts to your email subscribers, you could create a new category in WordPress and enter the feed of that category. You can enter multiple category feeds or multiple feeds from different sites if you wish by using ChimpFeedr or Yahoo Pipes to aggregate the feeds into one URL.
Choose a time of day (I prefer 9am GMT) for the email to be sent out, meaning your subscribers (in Europe and the US) will receive the post the morning after you publish it.
You can then choose the list to which the blog post email is sent (if you are new to MailChimp, you will only have one).
Make it personal
The emails that you send out to your list should be as personal as possible – almost as if you are sending an email to a friend or colleague – so your campaign information should reflect this. Here you are introduced to MailChimp merge tags (of which more later).
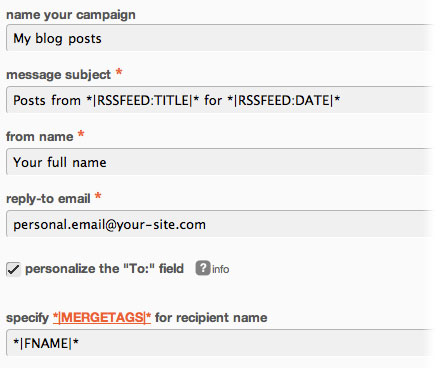
- name your campaign this is just for your benefit to identify the campaign
- message subject* this is the subject line of the email that your subscribers will receive. The default merge tags give the name of your blog plus the date. You could leave this as it is or change it to a permanent “Latest from my blog”, for example
- from name* I would make this your full name
- reply-to email * I would make this your personal email
- personalize the “To:” field info check this to make the email addressed personally – for example, the merge tags
*|FNAME|* *|LNAME|*will show “To: Bob Smith” instead of “To: [email protected]”.
Here you can also specify how the visits from these emails are recorded in Google Analytics which is very useful. You can also auto-tweet and auto-post to Facebook, if you wish.
Styling and creating your email
MailChimp being MailChimp, they have a host of pre-designed templates to choose from. I prefer to ignore these and choose the Basic (500px) template and style it up in the next phase.
A very user-friendly interface follows where you can add your logo and match colors and branding from your website. But it is very important to enter some merge tags in here to make sure the email actually sends out your blog posts.
One option is just to enter the following default RSS merge tag into the text edit area of the email editor.
*|RSS:POSTS_HTML|*But unfortunately, this does not give you full control of the way the blog post is reproduced in the email and it does not send the full content of the blog post which I don’t like. So I use the following merge tags to deliver the title and full content:
*|RSSITEM:TITLE|*<br>*|RSSITEM:CONTENT_FULL|*But even this isn’t perfect as I would like the user to be able to click on the title and go to the blog post to leave a comment. So, with
*|RSSITEM:TITLE|*selected click the link icon at the top of the text editor, and in the resulting pop-up box enter the “URL”*|RSSITEM:URL|*making sure the protocol is “” rather than “http://”. Here is an image of possible uses of the MailChimp merge tags: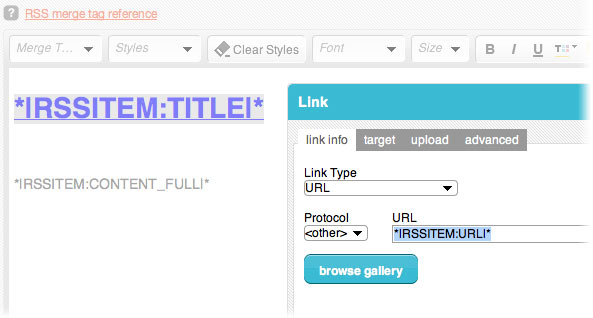
That (apart from adapting the plain text version and starting the campaign) is more or less it. Creating an RSS-driven campaign may not sound like the most glamorous thing you’ve ever done but, once set up, it is an amazingly powerful marketing instrument that can run on auto-pilot driving traffic to your website and interest to your brand.
MailChimp RSS to email tutorial
Here is a tutorial from MailChimp’s blog about how to set up an RSS campaign.
Why not use Feedburner to do this?
You can, of course, use Feedburner to get subscribers and receive your feed. But the primary benefit of using AWeber or MailChimp to send you blog posts by email is your ability to send other emails to your list. This is a huge benefit as you may want to send your subscribers specific messages later on.
And there are many, many other features (for example the ability to brand and design your email exactly how you want it) that also make this a better idea.
-
SECTION 4:
Conclusion
-
12Further readingTextPlease see text and downloadable PDF for recommendations of further reading on Email Marketing.
I really enjoyed creating this course and I hope you enjoy taking it.Lots of love,Rob Cubbon -
SECTION 5:
MORE FREE COURSES & SPECIAL OFFERS!
-
13Free Course and Special Offer!05:33
Free course: Talking With Clients – Creating a WordPress Website http://www.udemy.com/wordpress-website-talking-to-clients/
Special Offer: Designing A Website in Photoshop, Illustrator (& GIMP) http://www.udemy.com/designing-a-website-in-photoshop-illustrator-gimp/?couponCode=offer19
Special Offer: Create A Custom Responsive WordPress Website For A Client http://www.udemy.com/create-custom-responsive-wordpress-website-client/?couponCode=offer19
Keep up-to-date with my NEW free courses and free e-books. http://robcubbon.com/free